
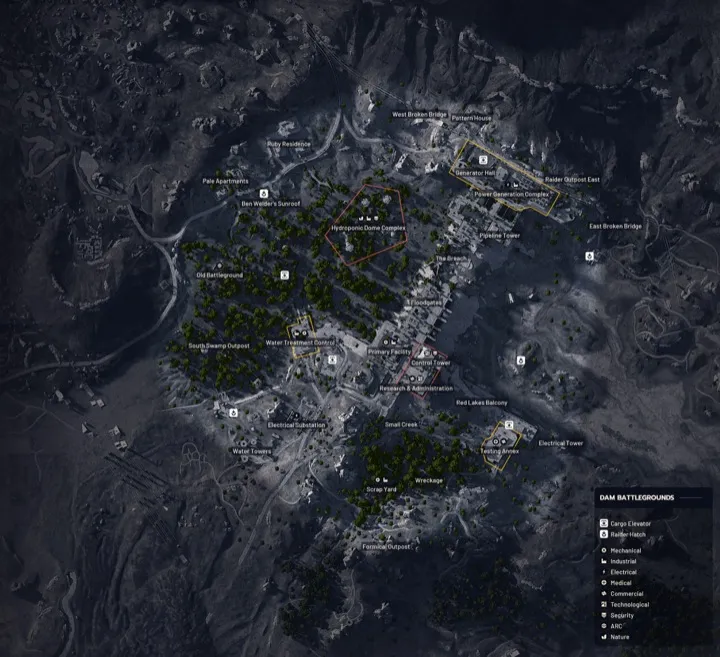
Dam Battlegrounds map guide
Dam Battlegrounds is where every raider starts: difficulty 2/5, no unlock requirement, 30-minute rounds. The Alcantara Power Plant splits a landscape of battle-scarred swampland and dense forest, and everything worth stealing sits somewhere along that concrete spine. This guide covers the loot geography, the eight surveyed exits, and the one puzzle worth learning by heart — all of it plotted on the interactive survey map.
The loot geography
Five surveyed loot areas anchor the map: the Control Tower, the Hydroponic Dome Complex, the Power Generation Complex, the Testing Annex, and Water Treatment Control. The pattern that matters: three of those five sit on or inside the dam structure itself, so the center of the map is where the fights happen. The Hydroponic Dome Complex is the notable exception — domed greenhouses off the main artery that let quieter squads fill bags without contesting the plant.
Named landmarks worth learning early: The Breach, Red Lakes Balcony, Research & Administration, and the Primary Facility — 28 landmarks are pinned on the survey sheet if you want the full tour before you drop.
The Controlled Access Zone
Added in Update 1.17.0, the Controlled Access Zone is the map's high-value vault, and it's gated by a cooperative puzzle rather than a key:
- Power the lock room with a fuel cell.
- Hit four switches nearly simultaneously. Three players can cover the spread — a Snap Hook makes the distances workable with fewer hands.
- Feed the electrical panel the randomized items it asks for. When it's satisfied, the final loot room opens.
The randomized-items step is why the CAZ rewards squads that loot before attempting it: arrive with a spread of common materials instead of planning a naked rush. And because the puzzle is loud, multi-step, and famous, assume another squad heard the switches — clear your backline before the panel step.
Eight ways out
Extraction is where Dam runs teach good habits. The survey sheet marks eight:
- Raider hatches — Ben Welder's Sunroof, Control Tower, East Broken Bridge, Electrical Substation. Solo-friendly, quick in-and-out.
- Cargo elevators — Generator Hall, Old Battleground, Testing Annex, Water Treatment Control. The heavy-haul option, and the obvious ambush magnet: elevators telegraph your exit to everyone nearby.
The practical read: raider hatches on the map's east and south edges pair naturally with a Hydroponic-or-Testing-Annex loop, while a Water Treatment haul can ride the elevator in the same complex — shortest walk on the map from full bag to gone.
The machines you'll meet
Six ARC types patrol Dam: Sentinels, Bombardiers, Bastions, and Leapers hold the open areas, and the map rotates the Queen (the Harvester condition) and Matriarch as boss conditions. The big three — Bastion, Bombardier, Leaper — punish open-ground crossings, which is exactly what the swamp's vegetation is for. Check each machine's weak points in the ARC database before you pick a fight, and the armory for what actually penetrates their armor.
The starter-zone loop
A repeatable early route that respects all of the above: drop toward the Hydroponic Dome Complex, fill on greenhouse loot, swing through Research & Administration for the landmark spawns, and slide out the East Broken Bridge raider hatch. It avoids the plant's center fights entirely, touches one loot area and one landmark cluster, and ends at a hatch instead of a loud elevator. Once you're comfortable, the CAZ is the graduation exam.
Contracts that send you here are tracked on the quest board, and everything the map hands you can be checked against the loot value tiers before you decide what rides home.
Dam map markers
| Category | Locations |
|---|---|
| extraction | 8 |
| landmark | 28 |
| loot | 5 |
Sources & updates
Sources
Updates
- Game version 1.36.1
- 2026-10-03 · Tightened guide copy and map comparison.
- Report a correction